
If you’ve ever worked with industrial machinery—think conveyor systems, robotics arms, or even packaging lines—you’ve probably run into a tiny, make-or-break part that keeps components from slipping on shafts. That’s a shaft locking assembly, and let’s be real: if that part fails, your whole operation grinds to a halt. I’ve been selling these (yes, full transparency, I’m from a shaft locking assembly supplier) for over 7 years now, and one question I get nonstop is: how does a self-locking shaft locking assembly actually work? Most people assume it’s just a fancy clamp, but there’s a lot more going on under the hood. Let’s break it down like I would for a new customer who just had a locking disc blow out on their production floor.
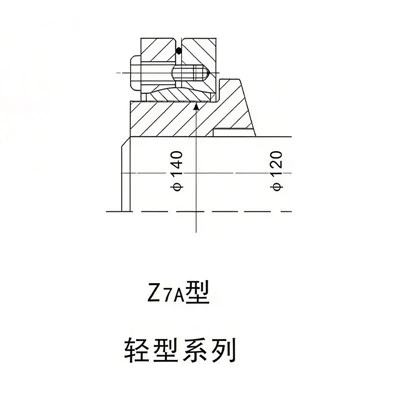
First off, let’s skip the confusing jargon for a sec. A self-locking assembly is different from a standard bolted clamp you might tighten with a wrench—once it’s set up right, it doesn’t need regular re-tightening, which is a huge win for maintenance teams that are already stretched thin. The core design relies on two key things: a wedge-shaped mechanism and friction, not just force from a bolt. Let’s start with the basic anatomy, because that’s where the “self-locking” magic happens. Every self-locking unit has three main parts: the inner ring (this fits tight around the shaft), the outer housing (which connects to the component you’re locking, like a gear or pulley), and a series of small, angled steel wedges sitting between them. These wedges aren’t random—they’re cut at a precise angle, usually 1 to 3 degrees, which is the sweet spot for self-locking.
Wait, let’s test this with a simple example, no engineering degree required. Imagine you’re trying to drive a wedge between two boards to hold them together. If the wedge is angled just right, once you hammer it in, it won’t slip out on its own—you have to pull it backward. That’s exactly the same idea here. When you assemble the locking unit, you tighten a central bolt (or sometimes a set of bolts) that pulls the wedges inward between the inner ring and outer housing. As the wedges move, they push the inner ring tight against the shaft and the outer housing tight against the component. Now, here’s the self-locking part: the angle of the wedges means that any force trying to make the component rotate or shift (like torque from a motor, or sudden load changes) actually pushes the wedges tighter between the two parts. It’s like when you push a door open—if the hinge pin is angled just right, it locks in place instead of sliding back. That’s why you never have to check the torque on these things again after installation.
I know a lot of you are probably thinking, “Okay, that’s cool, but what about different sizes? I can’t use a one-size-fits-all part on a conveyor for a small parts line vs. a heavy-duty manufacturing line.” Fair point. We’ve got a range of locking assemblies built for specific needs, so let’s talk through some common ones to make this real. First, if you need a reliable, workhorse part for standard applications—like a conveyor that moves boxes around a warehouse, or a small packaging machine—our Standard Shaft Locking Assembly is the go-to. It’s designed for moderate torque loads, easy to install, and fits most common shaft sizes. We also make a Lightweight Shaft Locking Assembly for applications where every pound counts—think drone components, small robotics arms, or portable machinery. It uses high-strength aluminum instead of steel, so it cuts weight by 30% without sacrificing grip, which is a game-changer for aerospace or medical equipment manufacturers.


Now, let’s get to the heavy stuff because that’s where people mess up. If you’re dealing with mining equipment, large conveyor pulleys, or industrial presses that generate tons of torque, you can’t use a standard assembly. That’s where our Heavy Duty Locking Assembly comes in. These have thicker wedges, a sturdier outer housing, and they’re torque-rated for loads up to 100,000 Nm (yes, that’s a lot—enough to move a semi-truck on its wheels). The self-locking design works the same way, but the materials are upgraded to handle the constant stress of heavy, high-cycle operations. We also have a Shaft Shrink Disc Assembly for super-precise applications, like high-speed CNC machines, where even a tiny amount of slip can ruin a part. Shrink discs work by heating the outer housing slightly to expand it, slipping it over the shaft, and letting it cool—creating an ultra-tight fit that eliminates any play, and it’s still self-locking once set.
Wait, let’s address a common mistake I see new customers make: installing a locking assembly wrong and then wondering why it slips. Installation is super straightforward, but skipping a step can break the self-locking function. First, you always clean the shaft and inner ring—any dirt, grease, or burrs will prevent the wedges from seating properly. Then, you hand-tighten the central bolts in a crisscross pattern (like changing tire bolts) to make sure the wedges go in evenly, not just on one side. Finally, you torque the bolts to the exact spec for your assembly—over-tightening can crack the housing, under-tightening means the wedges don’t engage right. Once that’s done, test it with a small load first before running full production. I once had a customer call me panicking because their locking unit slipped on a new printing press, and it turned out they’d skipped crisscross-tightening the bolts, so one wedge was loose and couldn’t lock. Fixing that took 10 minutes, and they were back up and running no problem.
Another question I get: how is self-locking different from other locking methods, like keyed shafts or set screws? Keyed shafts use a flat cut on the shaft and a key that fits into a slot on the component—this works, but it has a few downsides. The key and slot create weak points on the shaft (you’re cutting metal away, which can cause it to snap under heavy load), and it requires precise alignment, which adds install time. Set screws are even worse—they dig into the shaft, leaving permanent marks, and they loosen over time because of vibration, so you have to re-tighten them every few weeks. Self-locking assemblies? No shaft machining required (wait, except for a smooth, clean surface, no keyway), no digging into the shaft, and they don’t loosen. That’s why more and more engineers are switching to these for new machinery builds.
Let’s talk about real-world use cases to put this in perspective. Last year, we worked with a food processing company that was having constant issues with their mixer shafts. They’d been using set screws, which would slip when mixing thick dough or batter, leading to uneven product and downtime. We suggested our Standard Shaft Locking Assembly—easy to install, no keyway needed, and self-locking so it wouldn’t loosen from the constant vibration of the mixer. They installed it, and reported that downtime from shaft slippage dropped by 90%—that’s millions of dollars saved a year. Another customer, a robotics firm, needed lightweight parts for their warehouse picking robots, so we sent them the Lightweight Shaft Locking Assembly. Their robots are now lighter, faster, and don’t have any slip issues, which has cut their order fulfillment time by 15%.
So, to wrap this up in simple terms: a self-locking shaft locking assembly uses angled wedges between an inner ring and outer housing. Tightening the central bolt pulls the wedges in, pushing the inner ring tight on the shaft and the outer housing tight on your component. Any torque or load tries to shift the component, which pushes the wedges tighter—hence self-locking. The right assembly depends on your load, weight needs, and application: Standard for general use, Lightweight for portability, Heavy Duty for extreme torque, and Shaft Shrink Disc for precision high-speed jobs.
If you’re tired of dealing with slipping shafts, regular maintenance, and downtime from faulty locking parts, we can help. Our team has been working with manufacturers across industries for years, and we can help you pick the right locking assembly for your exact needs. Don’t let a small part cause big problems for your operation—reach out to us to talk through your project and get a solution that works for you.
References:
- Machine Design: "Locking Assemblies Eliminate Slippage for Industrial Components" (2022)
- American Society of Mechanical Engineers (ASME): "Design Guidelines for Shaft Locking Devices" (2021)
- Parker Hannifin Industrial Division: "Self-Locking Mechanisms for Power Transmission Components" (2023)